PowerShell 技巧
PowerShell 技巧
# 设置代理
netsh winhttp set proxy 127.0.0.1:1080
# 取消代理
netsh winhttp reset proxy
# 查看代理
netsh winhttp show proxy

# clash 复制 power shell
$Env:http_proxy="http://127.0.0.1:7890";$Env:https_proxy="http://127.0.0.1:7890"
# clash 复制 cmd
set http_proxy=http://127.0.0.1:7890 & set https_proxy=http://127.0.0.1:7890
📌 基础命令
# 关闭休眠,使用硬盘,建议关闭
powercfg -h off
# 打开休眠
powercfg -h on

# 查看版本
$PSVersionTable

# 查找命令
Get-Command -Name '*Process'

# 安装最新的 PowerShellGet
Install-Module -Name PowerShellGet -Force

# 更新 PowerShellGet
Update-Module -Name PowerShellGet
Exit

# 获取安装的模块
Get-InstalledModule

# 获取安装在默认位置未导入会话的模块
Get-Module -ListAvailable

# 获取已经导入会话的模块
Get-Module

# 删除模块
Uninstall-Module [模块名] -Force -Verbose
powershell 因为在此系统上禁止运行脚本…
最近在自己电脑上使用 react-native 初始化项目出现了下面的错误,猜测应该是微软更新导致
react-native : 无法加载文件 C:\Users\SunSeekerX\AppData\Roaming\npm\react-native.ps1,因为在此系统上禁止运行脚本。有关
详细信息,请参阅 https:/go.microsoft.com/fwlink/?LinkID=135170 中的 about_Execution_Policies。
所在位置 行:1 字符: 1
+ react-native init demo
+ ~~~~~~~~~~~~
    + CategoryInfo          : SecurityError: (:) [],PSSecurityException
    + FullyQualifiedErrorId : UnauthorizedAccess
解决
win+X 启动
windows PowerShell(管理员)若要在本地计算机上运行您编写的未签名脚本和来自其他用户的签名脚本,请使用以下命令将计算机上的 执行策略更改为 RemoteSigned
# 更改执行策略
Set-ExecutionPolicy RemoteSigned -Scope CurrentUser -Confirm

# 查看执行策略
Get-ExecutionPolicy
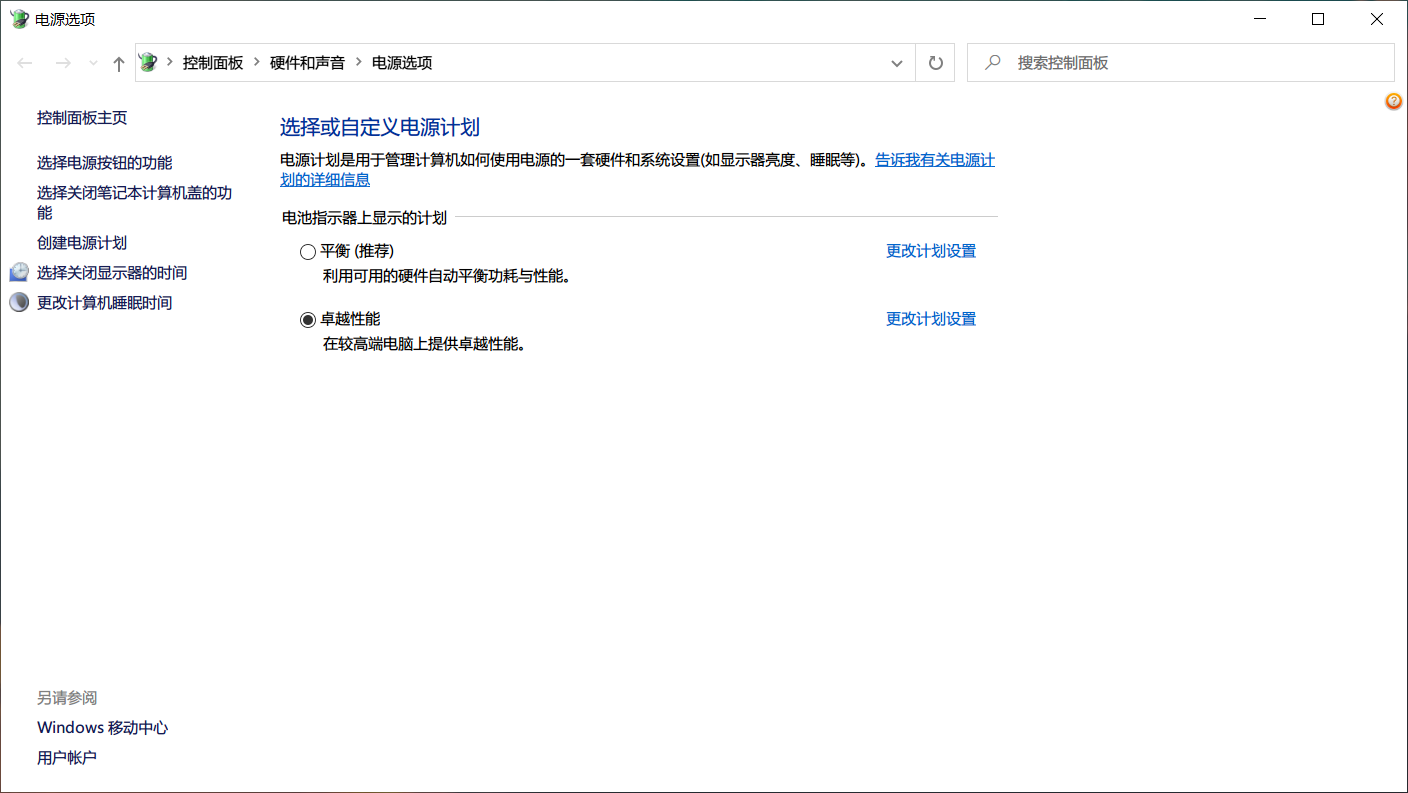
开启 win10 卓越性能模式
桌面按住shift加上鼠标右键选择在此处打开powershell窗口执行
powercfg -duplicatescheme e9a42b02-d5df-448d-aa00-03f14749eb61

# 输出
PS C:\Users\SunSeekerX\Desktop> powercfg -duplicatescheme e9a42b02-d5df-448d-aa00-03f14749eb61
电源方案 GUID: 124d9932-ad06-41b8-85a6-342c4b5c6db9  (卓越性能)
PS C:\Users\SunSeekerX\Desktop>

# 省电模式
powercfg -setactive a1841308-3541-4fab-bc81-f71556f20b4a
去电源选项选择卓越性能就 ok 了
刷新环境变量
powershell
$env:Path = [System.Environment]::GetEnvironmentVariable("Path","Machine")
# or
$env:Path = [System.Environment]::GetEnvironmentVariable("Path","Machine") + ";" + [System.Environment]::GetEnvironmentVariable("Path","User")
cmd
open cmd commend prompt window.
input
set PATH=C-> this will refresh the environment variables. close and restart cmd window. inputecho %PATH%to test.
set PATH=C
# 关闭窗口重新打开,输入
echo %PATH%
📌 强化 PowerShell
1️⃣ 安装 Windows Terminal
在 Microsoft Store 中下载 Windows Terminal 注意系统要求
2️⃣ 安装 PowerShell core
下载地址:https://github.com/PowerShell/PowerShell/releases
win10 选择 PowerShell-7.1.0-preview.7-win-x64.msi 这种安装即可
3️⃣ 安装字体
这里推荐使用 Nerd Fonts 系列字体,它们在支持各种特殊字符的同时,设计也比较养眼。访问 Nerd Fonts 的 下载界面,从中任意选择一个心仪的字体包,下载压缩包后解压,再安装进系统即可。笔者使用的是 Agave Nerd Font,Oh my posh 官方推荐 Meslo LGM NF。
我是用的是 Hack Nerd Font。
Cascadia Code 也挺不错的4️⃣ 安装 PowerShell 模块
win+x 选择 Windows 终端(管理员)
CurrentUser 是仅为当前用户安装模块
安装过程中加上
-Verbose可以看到输出如果在安装过程中遇到类似于这样的提示:
不受信任的存储库你正在从不受信任的存储库安装模块。如果你信任该存储库,请通过运行 Set-PSRepositorycmdlet 更改其 InstallationPolicy 值。是否确实要从“PSGallery”安装模块?[Y] 是(Y) [A] 全是(A) [N] 否(N) [L] 全否(L) [S] 暂停(S) [?] 帮助你可以按 Y 或 A 键,但是如果你觉得每次都这样麻烦的话,可以先执行下面的命令,之后再安装模块就不会出现这个提示了。
Set-PSRepository -Name PSGallery -InstallationPolicy Trusted
posh-git
PowerShell 与 git 集成,可以在 PowerShell 显示 git 仓库信息,同时提供了 git 命令补全。
PowerShellGet\Install-Module posh-git -Force
# 普通用户
PowerShellGet\Install-Module posh-git -Scope CurrentUser -Force
oh-my-posh
Set-ExecutionPolicy Bypass -Scope Process -Force; Invoke-Expression ((New-Object System.Net.WebClient).DownloadString('https://ohmyposh.dev/install.ps1'))需要使用 Scoop 进行安装
# 安装 Scoop
Set-ExecutionPolicy -ExecutionPolicy RemoteSigned -Scope CurrentUser
Invoke-RestMethod -Uri https://get.scoop.sh | Invoke-Expression
# 安装 curl
scoop install curl

# 安装 oh-my-posh
Set-ExecutionPolicy Bypass -Scope Process -Force; Invoke-Expression ((New-Object System.Net.WebClient).DownloadString('https://ohmyposh.dev/install.ps1'))
或者使用 winget
winget install JanDeDobbeleer.OhMyPosh
# 更新
winget upgrade JanDeDobbeleer.OhMyPosh
修改终端配置文件
确定 Oh my posh 已经安装成功后,读者可以提前到项目官网的 主题页面 预览内置主题的效果,记下需要使用的主题在本地的路径。以 wopian 主题为例,使用不同安装方式得到的主题路径参考下表:
| 安装方式 | 路径 |
|---|---|
| Windows Scoop | ~\scoop\apps\oh-my-posh\current\themes\wopian.omp.json |
| Windows Choco/Winget | ~\AppData\Local\Programs\oh-my-posh\themes\wopian.omp.json |
| macOS Brew | ~/.poshthemes/wopian.omp.json |
| GNU/Linux 命令行 | ~/.poshthemes/wopian.omp.json |
| 自行下载 | Oh my Posh 和 Themes 需要填完整的自定义路径 |
万事俱备,下面我们需要修改终端的配置文件。不同的终端配置文件位置不同。如果你不知道自己使用的是什么终端,可以键入oh-my-posh --print-shell获得答案。
三大系统上的 PowerShell 配置文件有内置的变量$Profile。键入$Profile终端会显示配置文件的路径。编辑此文件,若没有,则新建一个。新增如下代码,重启终端就能看到效果。
oh-my-posh --init --shell pwsh --config 主题路径 | Invoke-Expression

# Windows Scoop
oh-my-posh --init --shell pwsh --config ~\scoop\apps\oh-my-posh\current\themes\cloud-native-azure.omp.json | Invoke-Expression
Bash 的配置文件一般是~/.bashrc 或者~/.profile,同上文一样,编辑对应的文件,若没有,则新建一个,新增下面一行代码并重启终端 1:
eval "$(oh-my-posh --init --shell bash --config 主题路径)"Zsh 的配置文件为~/.zshrc,需要新增的代码需要将bash改为zsh:
eval "$(oh-my-posh --init --shell zsh --config 主题路径)"在 Windows 的 Linux 子系统中使用 Oh my posh 无需像一般 GNU/Linux 那样另外安装,可以采用 oh-my-posh-wsl命令。需要注意,WSL 上同一文件的路径和 Windows 是不一样的,c:/ 应该写成/mnt/c/,例如,WSL 上的 Ubuntu .bashrc 文件应该添加:
eval "$(oh-my-posh-wsl --init --shell bash --config /mnt/c/users/用户名/AppData/Local/Programs/oh-my-posh/themes/wopian.omp.json)"fish 和 nu 用户可以参阅 官方文档。
PSColor
在默认情况下, PowerShell 的文件列表并不会彩色显示。
想要文件列表彩色显示的话,最简单的方法就是安装一个 PowerShell 模块:PSColor。
这个模块安装使用都很简单,打开 Windows PowerShell 管理员控制台,输入:
Install-Module PSColor
# 普通用户
Install-Module PSColor -Scope CurrentUser
当然安装完了之后,直接输入 ls,显示的还是黑白效果的文件列表,你还需要启动它,不论是在管理员控制台,还是普通用户控制台下,都可以直接输入:
Import-Module PSColorDirColors
哪些文件类型可以被加亮显示是可以配置的,在 PSColor 官方的 README 中有介绍,这里就不转述了。不过这个配置方式是 PowerShell 式的,如果能直接像上面使用 itermcolors 文件配置控制台色彩一样,直接用 Linux 平台上的现成的 dircolors 配置文件的话,会不会更方便呢?这个想法很好,而且还真的有人实现了,它就是 DirColors。
Install-Module DirColors
# 普通用户
Install-Module DirColors -Scope CurrentUser
就可以安装上了。之后,使用:
Import-Module DirColors导入该模块。接下来,如果你想要载入某个现成的 dircolors 配置文件的话,只需要用:
Update-DirColors ~\dir_colors这条命令就可以了。
其中 ~\dir_colors 就是配置文件的路径,关于 dir_colors 的配置文件,在 github 上可以搜到不少,比如:dircolors-solarized。这里就不再列举更多了。
PSReadLine
如果是使用自带的 powershell,先执行
Install-Module -Name PowerShellGet -Force
Exit
然后安装
Install-Module PSReadLine -Force
# 稳定版本
Install-Module PSReadLine
5️⃣ 配置 PowerShell
字体配置
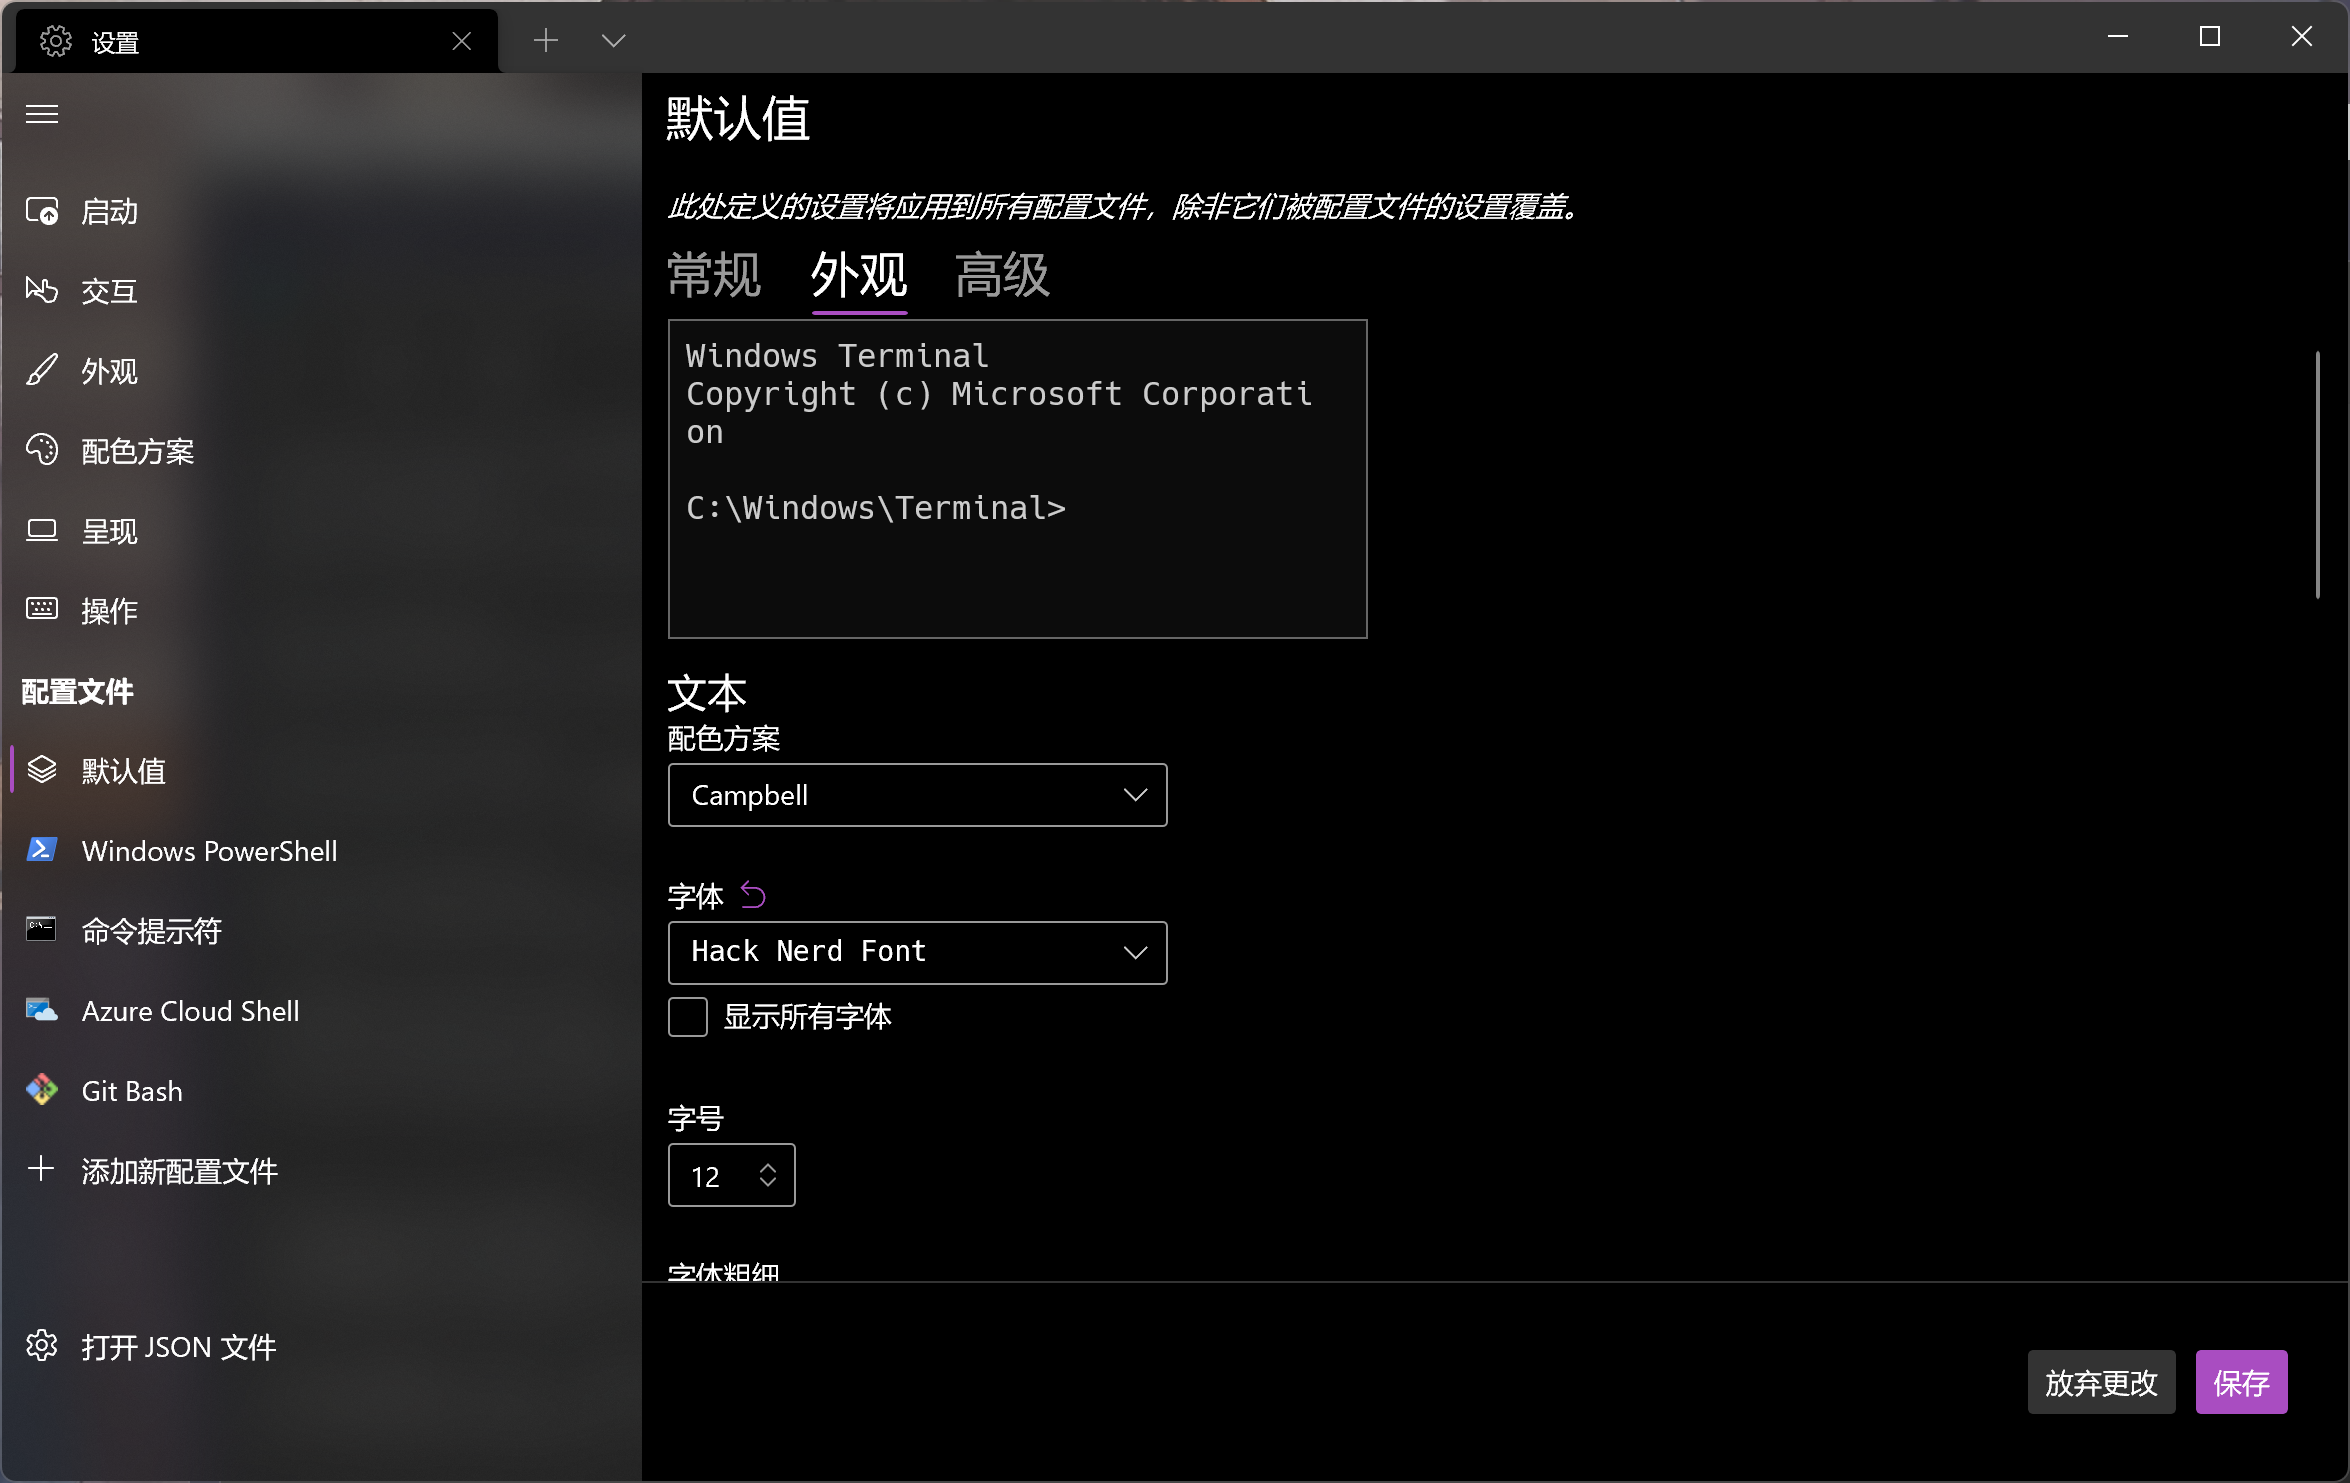
模块配置
0x1 输入:
$PROFILE

# C:\Users\SunSeekerX\Documents\PowerShell\Microsoft.PowerShell_profile.ps1
0x2 继续输入:
if (!(Test-Path -Path $PROFILE )) { New-Item -Type File -Path $PROFILE -Force }
notepad $PROFILE
0x3 在打开的文件中添加
该文件是每次启动 PowerShell 执行的文件,加载模块和初始化设置
# Import Modules BEGIN
# 引入 DirColors
Import-Module DirColors

# 引入 posh-git
Import-Module posh-git

# 引入 oh-my-posh
oh-my-posh --init --shell pwsh --config ~\AppData\Local\Programs\oh-my-posh\themes\negligible.omp.json | Invoke-Expression

# 引入 ps-read-line
Import-Module PSReadLine
# Import Modules END

# Set Hot-keys BEGIN
# 设置预测文本来源为历史记录
Set-PSReadLineOption -PredictionSource History

# 每次回溯输入历史,光标定位于输入内容末尾
Set-PSReadLineOption -HistorySearchCursorMovesToEnd

# 设置 Tab 为菜单补全和 Intellisense
Set-PSReadLineKeyHandler -Key "Tab" -Function MenuComplete

# 设置 Ctrl+d 为退出 PowerShell
Set-PSReadlineKeyHandler -Key "Ctrl+d" -Function ViExit

# 设置 Ctrl+z 为撤销
Set-PSReadLineKeyHandler -Key "Ctrl+z" -Function Undo

# 设置向上键为后向搜索历史记录
Set-PSReadLineKeyHandler -Key UpArrow -Function HistorySearchBackward

# 设置向下键为前向搜索历史纪录
Set-PSReadLineKeyHandler -Key DownArrow -Function HistorySearchForward
# Set Hot-keys END
6️⃣ 配置 Windows Terminal
2025-11-11 14:38:10
如果搞坏了删不掉的 优先试试 360 的右键菜单管理有奇效
试试 https://github.com/BluePointLilac/ContextMenuManager
# 写入
New-Item -ItemType Directory -Path "$env:USERPROFILE\AppData\Local\terminal" -Force | Out-Null; Invoke-WebRequest "https://raw.githubusercontent.com/yanglr/WindowsDevTools/master/awosomeTerminal/icons/wt_32.ico" -OutFile "$env:USERPROFILE\AppData\Local\terminal\wt_32.ico"
# 打开文件夹
Start-Process "$env:USERPROFILE\AppData\Local\terminal"
# 添加到右键 默认当前路径
Set-ItemProperty -Path "Registry::HKEY_CLASSES_ROOT\Directory\Background\shell\wt" -Name '(default)' -Value 'Open in Windows Terminal'; Set-ItemProperty -Path "Registry::HKEY_CLASSES_ROOT\Directory\Background\shell\wt\command" -Name '(default)' -Value "$env:USERPROFILE\AppData\Local\Microsoft\WindowsApps\wt.exe -d `"%V`""
# 文件夹空白处右键
New-Item -Path "Registry::HKEY_CLASSES_ROOT\Directory\Background\shell\wt" -Force | Out-Null; Set-ItemProperty -Path "Registry::HKEY_CLASSES_ROOT\Directory\Background\shell\wt" -Name '(default)' -Value 'Open in Windows Terminal'; Set-ItemProperty -Path "Registry::HKEY_CLASSES_ROOT\Directory\Background\shell\wt" -Name 'Icon' -Value "$env:USERPROFILE\AppData\Local\terminal\wt_32.ico"; New-Item -Path "Registry::HKEY_CLASSES_ROOT\Directory\Background\shell\wt\command" -Force | Out-Null; Set-ItemProperty -Path "Registry::HKEY_CLASSES_ROOT\Directory\Background\shell\wt\command" -Name '(default)' -Value "$env:USERPROFILE\AppData\Local\Microsoft\WindowsApps\wt.exe -d `"%V`""; `
# 删除文件夹空白处右键 "Open in Windows Terminal"
Remove-Item -Path "Registry::HKEY_CLASSES_ROOT\Directory\Background\shell\wt" -Recurse -Force -ErrorAction SilentlyContinue

# 需要安装wt 和 powershell core
# Open PowerShell in WT
New-Item -Path "Registry::HKEY_CLASSES_ROOT\Directory\Background\shell\powershell-wt" -Force | Out-Null
Set-ItemProperty -Path "Registry::HKEY_CLASSES_ROOT\Directory\Background\shell\powershell-wt" -Name '(default)' -Value 'Open PowerShell in WT'
Set-ItemProperty -Path "Registry::HKEY_CLASSES_ROOT\Directory\Background\shell\powershell-wt" -Name 'Icon' -Value "$env:USERPROFILE\AppData\Local\terminal\wt_32.ico"
Remove-ItemProperty -Path "Registry::HKEY_CLASSES_ROOT\Directory\Background\shell\powershell-wt" -Name 'Extended' -ErrorAction SilentlyContinue
Rename-ItemProperty -Path "Registry::HKEY_CLASSES_ROOT\Directory\Background\shell\powershell-wt" -Name 'HideBasedOnVelocityId' -NewName 'ShowBasedOnVelocityId' -ErrorAction SilentlyContinue
New-Item -Path "Registry::HKEY_CLASSES_ROOT\Directory\Background\shell\powershell-wt\command" -Force | Out-Null
Set-ItemProperty -Path "Registry::HKEY_CLASSES_ROOT\Directory\Background\shell\powershell-wt\command" -Name '(default)' -Value "$env:USERPROFILE\AppData\Local\Microsoft\WindowsApps\wt.exe new-tab -p `"PowerShell`" --startingDirectory `"%V`""
# 删除 PowerShell in WT 菜单项
Remove-Item -Path "Registry::HKEY_CLASSES_ROOT\Directory\Background\shell\powershell-wt" -Recurse -Force -ErrorAction SilentlyContinue

# # 需要安装wt 和 gitbash
# Open Git Bash in WT
New-Item -Path "Registry::HKEY_CLASSES_ROOT\Directory\Background\shell\gitbash-wt" -Force | Out-Null
Set-ItemProperty -Path "Registry::HKEY_CLASSES_ROOT\Directory\Background\shell\gitbash-wt" -Name '(default)' -Value 'Open Git Bash in WT'
Set-ItemProperty -Path "Registry::HKEY_CLASSES_ROOT\Directory\Background\shell\gitbash-wt" -Name 'Icon' -Value "C:\Program Files\Git\mingw64\share\git\git-for-windows.ico"
Remove-ItemProperty -Path "Registry::HKEY_CLASSES_ROOT\Directory\Background\shell\gitbash-wt" -Name 'Extended' -ErrorAction SilentlyContinue
Rename-ItemProperty -Path "Registry::HKEY_CLASSES_ROOT\Directory\Background\shell\gitbash-wt" -Name 'HideBasedOnVelocityId' -NewName 'ShowBasedOnVelocityId' -ErrorAction SilentlyContinue
New-Item -Path "Registry::HKEY_CLASSES_ROOT\Directory\Background\shell\gitbash-wt\command" -Force | Out-Null
Set-ItemProperty -Path "Registry::HKEY_CLASSES_ROOT\Directory\Background\shell\gitbash-wt\command" -Name '(default)' -Value "$env:USERPROFILE\AppData\Local\Microsoft\WindowsApps\wt.exe new-tab -p `"Git Bash`" --startingDirectory `"%V`""
# 删除 Git Bash in WT 菜单项
Remove-Item -Path "Registry::HKEY_CLASSES_ROOT\Directory\Background\shell\gitbash-wt" -Recurse -Force -ErrorAction SilentlyContinue


# 需要 wt 和 ubuntu 24 wsl
# Open Ubuntu 24 in WT 右键菜单直接显示,不需要 Shift(注意 GUID 必须用双引号)
New-Item -Path "Registry::HKEY_CLASSES_ROOT\Directory\Background\shell\wsl24" -Force | Out-Null; Set-ItemProperty -Path "Registry::HKEY_CLASSES_ROOT\Directory\Background\shell\wsl24" -Name '(default)' -Value 'Open Ubuntu 24 in WT'; Set-ItemProperty -Path "Registry::HKEY_CLASSES_ROOT\Directory\Background\shell\wsl24" -Name 'Icon' -Value "$env:USERPROFILE\AppData\Local\terminal\wt_32.ico"; Remove-ItemProperty -Path "Registry::HKEY_CLASSES_ROOT\Directory\Background\shell\wsl24" -Name 'Extended' -ErrorAction SilentlyContinue; Rename-ItemProperty -Path "Registry::HKEY_CLASSES_ROOT\Directory\Background\shell\wsl24" -Name 'HideBasedOnVelocityId' -NewName 'ShowBasedOnVelocityId' -ErrorAction SilentlyContinue; New-Item -Path "Registry::HKEY_CLASSES_ROOT\Directory\Background\shell\wsl24\command" -Force | Out-Null; Set-ItemProperty -Path "Registry::HKEY_CLASSES_ROOT\Directory\Background\shell\wsl24\command" -Name '(default)' -Value "`"$env:USERPROFILE\AppData\Local\Microsoft\WindowsApps\wt.exe`" new-tab -p `"{d8e96812-b789-5068-a5ae-10b2fb53e95f}`" --startingDirectory `"%V`""
# 删除
Remove-Item -Path "Registry::HKEY_CLASSES_ROOT\Directory\Background\shell\wsl24" -Recurse -Force

# Open Ubuntu 22 in WT 右键菜单直接显示,不需要 Shift(注意 GUID 必须用双引号,单引号会被注册表原样传给 wt 导致匹配失败回落到默认 profile)
New-Item -Path "Registry::HKEY_CLASSES_ROOT\Directory\Background\shell\wsl22" -Force | Out-Null; Set-ItemProperty -Path "Registry::HKEY_CLASSES_ROOT\Directory\Background\shell\wsl22" -Name '(default)' -Value 'Open Ubuntu 22 in WT'; Set-ItemProperty -Path "Registry::HKEY_CLASSES_ROOT\Directory\Background\shell\wsl22" -Name 'Icon' -Value "$env:USERPROFILE\AppData\Local\terminal\wt_32.ico"; Remove-ItemProperty -Path "Registry::HKEY_CLASSES_ROOT\Directory\Background\shell\wsl22" -Name 'Extended' -ErrorAction SilentlyContinue; Rename-ItemProperty -Path "Registry::HKEY_CLASSES_ROOT\Directory\Background\shell\wsl22" -Name 'HideBasedOnVelocityId' -NewName 'ShowBasedOnVelocityId' -ErrorAction SilentlyContinue; New-Item -Path "Registry::HKEY_CLASSES_ROOT\Directory\Background\shell\wsl22\command" -Force | Out-Null; Set-ItemProperty -Path "Registry::HKEY_CLASSES_ROOT\Directory\Background\shell\wsl22\command" -Name '(default)' -Value "`"$env:USERPROFILE\AppData\Local\Microsoft\WindowsApps\wt.exe`" new-tab -p `"{4ff56d04-d9cf-57ea-bae2-ad396374e7e3}`" --startingDirectory `"%V`""
# 删除
Remove-Item -Path "Registry::HKEY_CLASSES_ROOT\Directory\Background\shell\wsl22" -Recurse -Force
wt 配置文件
可选:显式指定 commandline,确保 --startingDirectory 能正确跳转到对应目录
// 修改前
{
    "guid": "{d8e96812-b789-5068-a5ae-10b2fb53e95f}",
    "hidden": false,
    "name": "Ubuntu 24.04.1 LTS",
    "source": "CanonicalGroupLimited.Ubuntu24.04LTS_79rhkp1fndgsc"
}

// 修改后
{
    "guid": "{d8e96812-b789-5068-a5ae-10b2fb53e95f}",
    "hidden": false,
    "name": "Ubuntu 24.04.1 LTS",
    "commandline": "wsl.exe -d Ubuntu-24.04",
    "source": "CanonicalGroupLimited.Ubuntu24.04LTS_79rhkp1fndgsc"
}
添加 Windows Terminal 到右键(这是老的 也可以用)
如果是 win11 官方镜像的系统,默认应该就已经安装到了右键。没有安装的可以手动安装下。
0x1 下载图标
下载地址:icon,放到 C:\Users\[user_name]\AppData\Local\terminal,没有这个文件夹新建一个。
注意:[user_name] 是你自己电脑的用户名
0x2 写入注册表
创建一个 txt 文档,并把档后缀改为 reg。文档的名字可自己创建,后缀名不可以错。右键菜单出现 Windows Terminal 有两种方法。一种是按shift+ 右键,另一种是直接右键。
shift + 右键
把下面的内容复制到 reg 去
Windows Registry Editor Version 5.00

[HKEY_CLASSES_ROOT\Directory\Background\shell\wt]
@="Windows Terminal"
"Icon"="%USERPROFILE%\\AppData\\Local\\terminal\\wt_32.ico"
"Extended"=""

[HKEY_CLASSES_ROOT\Directory\Background\shell\wt\command]
@="C:\\Users\\[user_name]\\AppData\\Local\\Microsoft\\WindowsApps\\wt.exe"注意:请把 [user_name] 改成自己电脑的用户名
右键
把下面的内容复制到 reg 去
Windows Registry Editor Version 5.00

[HKEY_CLASSES_ROOT\Directory\Background\shell\wt]
@="Windows terminal here"
"Icon"="%USERPROFILE%\\AppData\\Local\\terminal\\wt_32.ico"

[HKEY_CLASSES_ROOT\Directory\Background\shell\wt\command]
@="C:\\Users\\[user_name]\\AppData\\Local\\Microsoft\\WindowsApps\\wt.exe"注意:请把 [user_name] 改成自己电脑的用户名
0x3 修改 Windows Terminal 的 settings.json
把 profiles > list > startingDirectory 改为 null,没有的自己创建一个。
可以选择的改你需要的。(我都改了)
这个是修改右键启动路径为当前运行命令的路径。
配置 vscode 取消 logo
加入下面这个在启动的时候就不会有 logo 打印了,就是诸如 加载个人文件花费了多少毫秒的提示
"terminal.integrated.shellArgs.windows": ["-NoLogo", "-NoExit", "-Command", "& { Write-Host }"]7️⃣ 结语
平时工作中命令行 git 命令用的比较多,安装了扩展,输入命令可以按 Tab 来自动补全方便了很多。
Windows 下的命令行还有很多的玩法,比如支持 Linux 命令的 MSYS2,集成了 pacman。 可以参考 Win10 终端神器——Windows Terminal 与 MSYS2 MinGW64 集成记 进行安装。
Windows Terminal 配置 json 参考
{
  "$help": "https://aka.ms/terminal-documentation",
  "$schema": "https://aka.ms/terminal-profiles-schema",
  "actions": [
    {
      "command": {
        "action": "copy",
        "singleLine": false
      },
      "keys": "ctrl+c"
    },
    {
      "command": "paste",
      "keys": "ctrl+v"
    },
    {
      "command": "find",
      "keys": "ctrl+shift+f"
    },
    {
      "command": {
        "action": "splitPane",
        "split": "auto",
        "splitMode": "duplicate"
      },
      "keys": "alt+shift+d"
    }
  ],
  "copyFormatting": "none",
  "copyOnSelect": false,
  "defaultProfile": "{574e775e-4f2a-5b96-ac1e-a2962a402336}",
  "profiles": {
    "defaults": {
      "colorScheme": "One Half Dark",
      "elevate": true,
      "experimental.retroTerminalEffect": false,
      "font": {
        "face": "JetBrainsMono Nerd Font",
        "weight": "bold"
      },
      "opacity": 80,
      "useAcrylic": true
    },
    "list": [
      {
        "commandline": "%SystemRoot%\\System32\\WindowsPowerShell\\v1.0\\powershell.exe",
        "guid": "{61c54bbd-c2c6-5271-96e7-009a87ff44bf}",
        "hidden": false,
        "name": "Windows PowerShell",
        "startingDirectory": null
      },
      {
        "commandline": "%SystemRoot%\\System32\\cmd.exe",
        "guid": "{0caa0dad-35be-5f56-a8ff-afceeeaa6101}",
        "hidden": false,
        "name": "\u547d\u4ee4\u63d0\u793a\u7b26",
        "startingDirectory": null
      },
      {
        "guid": "{b453ae62-4e3d-5e58-b989-0a998ec441b8}",
        "hidden": false,
        "name": "Azure Cloud Shell",
        "source": "Windows.Terminal.Azure",
        "startingDirectory": null
      },
      {
        "guid": "{574e775e-4f2a-5b96-ac1e-a2962a402336}",
        "hidden": false,
        "name": "PowerShell",
        "source": "Windows.Terminal.PowershellCore",
        "startingDirectory": null
      }
    ]
  },
  "schemes": [
    {
      "background": "#0C0C0C",
      "black": "#0C0C0C",
      "blue": "#0037DA",
      "brightBlack": "#767676",
      "brightBlue": "#3B78FF",
      "brightCyan": "#61D6D6",
      "brightGreen": "#16C60C",
      "brightPurple": "#B4009E",
      "brightRed": "#E74856",
      "brightWhite": "#F2F2F2",
      "brightYellow": "#F9F1A5",
      "cursorColor": "#FFFFFF",
      "cyan": "#3A96DD",
      "foreground": "#CCCCCC",
      "green": "#13A10E",
      "name": "Campbell",
      "purple": "#881798",
      "red": "#C50F1F",
      "selectionBackground": "#FFFFFF",
      "white": "#CCCCCC",
      "yellow": "#C19C00"
    },
    {
      "background": "#012456",
      "black": "#0C0C0C",
      "blue": "#0037DA",
      "brightBlack": "#767676",
      "brightBlue": "#3B78FF",
      "brightCyan": "#61D6D6",
      "brightGreen": "#16C60C",
      "brightPurple": "#B4009E",
      "brightRed": "#E74856",
      "brightWhite": "#F2F2F2",
      "brightYellow": "#F9F1A5",
      "cursorColor": "#FFFFFF",
      "cyan": "#3A96DD",
      "foreground": "#CCCCCC",
      "green": "#13A10E",
      "name": "Campbell Powershell",
      "purple": "#881798",
      "red": "#C50F1F",
      "selectionBackground": "#FFFFFF",
      "white": "#CCCCCC",
      "yellow": "#C19C00"
    },
    {
      "background": "#282C34",
      "black": "#282C34",
      "blue": "#61AFEF",
      "brightBlack": "#5A6374",
      "brightBlue": "#61AFEF",
      "brightCyan": "#56B6C2",
      "brightGreen": "#98C379",
      "brightPurple": "#C678DD",
      "brightRed": "#E06C75",
      "brightWhite": "#DCDFE4",
      "brightYellow": "#E5C07B",
      "cursorColor": "#FFFFFF",
      "cyan": "#56B6C2",
      "foreground": "#DCDFE4",
      "green": "#98C379",
      "name": "One Half Dark",
      "purple": "#C678DD",
      "red": "#E06C75",
      "selectionBackground": "#FFFFFF",
      "white": "#DCDFE4",
      "yellow": "#E5C07B"
    },
    {
      "background": "#FAFAFA",
      "black": "#383A42",
      "blue": "#0184BC",
      "brightBlack": "#4F525D",
      "brightBlue": "#61AFEF",
      "brightCyan": "#56B5C1",
      "brightGreen": "#98C379",
      "brightPurple": "#C577DD",
      "brightRed": "#DF6C75",
      "brightWhite": "#FFFFFF",
      "brightYellow": "#E4C07A",
      "cursorColor": "#4F525D",
      "cyan": "#0997B3",
      "foreground": "#383A42",
      "green": "#50A14F",
      "name": "One Half Light",
      "purple": "#A626A4",
      "red": "#E45649",
      "selectionBackground": "#FFFFFF",
      "white": "#FAFAFA",
      "yellow": "#C18301"
    },
    {
      "background": "#002B36",
      "black": "#002B36",
      "blue": "#268BD2",
      "brightBlack": "#073642",
      "brightBlue": "#839496",
      "brightCyan": "#93A1A1",
      "brightGreen": "#586E75",
      "brightPurple": "#6C71C4",
      "brightRed": "#CB4B16",
      "brightWhite": "#FDF6E3",
      "brightYellow": "#657B83",
      "cursorColor": "#FFFFFF",
      "cyan": "#2AA198",
      "foreground": "#839496",
      "green": "#859900",
      "name": "Solarized Dark",
      "purple": "#D33682",
      "red": "#DC322F",
      "selectionBackground": "#FFFFFF",
      "white": "#EEE8D5",
      "yellow": "#B58900"
    },
    {
      "background": "#FDF6E3",
      "black": "#002B36",
      "blue": "#268BD2",
      "brightBlack": "#073642",
      "brightBlue": "#839496",
      "brightCyan": "#93A1A1",
      "brightGreen": "#586E75",
      "brightPurple": "#6C71C4",
      "brightRed": "#CB4B16",
      "brightWhite": "#FDF6E3",
      "brightYellow": "#657B83",
      "cursorColor": "#002B36",
      "cyan": "#2AA198",
      "foreground": "#657B83",
      "green": "#859900",
      "name": "Solarized Light",
      "purple": "#D33682",
      "red": "#DC322F",
      "selectionBackground": "#FFFFFF",
      "white": "#EEE8D5",
      "yellow": "#B58900"
    },
    {
      "background": "#000000",
      "black": "#000000",
      "blue": "#3465A4",
      "brightBlack": "#555753",
      "brightBlue": "#729FCF",
      "brightCyan": "#34E2E2",
      "brightGreen": "#8AE234",
      "brightPurple": "#AD7FA8",
      "brightRed": "#EF2929",
      "brightWhite": "#EEEEEC",
      "brightYellow": "#FCE94F",
      "cursorColor": "#FFFFFF",
      "cyan": "#06989A",
      "foreground": "#D3D7CF",
      "green": "#4E9A06",
      "name": "Tango Dark",
      "purple": "#75507B",
      "red": "#CC0000",
      "selectionBackground": "#FFFFFF",
      "white": "#D3D7CF",
      "yellow": "#C4A000"
    },
    {
      "background": "#FFFFFF",
      "black": "#000000",
      "blue": "#3465A4",
      "brightBlack": "#555753",
      "brightBlue": "#729FCF",
      "brightCyan": "#34E2E2",
      "brightGreen": "#8AE234",
      "brightPurple": "#AD7FA8",
      "brightRed": "#EF2929",
      "brightWhite": "#EEEEEC",
      "brightYellow": "#FCE94F",
      "cursorColor": "#000000",
      "cyan": "#06989A",
      "foreground": "#555753",
      "green": "#4E9A06",
      "name": "Tango Light",
      "purple": "#75507B",
      "red": "#CC0000",
      "selectionBackground": "#FFFFFF",
      "white": "#D3D7CF",
      "yellow": "#C4A000"
    },
    {
      "background": "#000000",
      "black": "#000000",
      "blue": "#000080",
      "brightBlack": "#808080",
      "brightBlue": "#0000FF",
      "brightCyan": "#00FFFF",
      "brightGreen": "#00FF00",
      "brightPurple": "#FF00FF",
      "brightRed": "#FF0000",
      "brightWhite": "#FFFFFF",
      "brightYellow": "#FFFF00",
      "cursorColor": "#FFFFFF",
      "cyan": "#008080",
      "foreground": "#C0C0C0",
      "green": "#008000",
      "name": "Vintage",
      "purple": "#800080",
      "red": "#800000",
      "selectionBackground": "#FFFFFF",
      "white": "#C0C0C0",
      "yellow": "#808000"
    }
  ],
  "theme": "light"
}
参考链接
Oh My Posh:全平台终端提示符个性化工具 by 柯帕
推荐一款 颜值爆表的主题终端 (windows ), by iwhao_top
添加 Windows Terminal 到鼠标右键菜单,by Jerry
PowerShell 美化指南 by 小马哥
Windows Terminal 完美配置 PowerShell 7.1 by littleNewton
Windows Terminal Preview
如果是通过 winget install Microsoft.WindowsTerminal.Preview 安装的 Preview,可执行文件通常在:
$env:USERPROFILE\AppData\Local\Microsoft\WindowsApps\Microsoft.WindowsTerminalPreview_8wekyb3d8bbwe\wt.exe
一键改写现有 4 个右键菜单到 Preview(单行命令,避免终端复制换行):
$previewWt=Join-Path $env:USERPROFILE 'AppData\Local\Microsoft\WindowsApps\Microsoft.WindowsTerminalPreview_8wekyb3d8bbwe\wt.exe'; Set-ItemProperty -Path 'Registry::HKEY_CLASSES_ROOT\Directory\Background\shell\gitbash-wt\command' -Name '(default)' -Value ('"' + $previewWt + '" new-tab -p "Git Bash" --startingDirectory "%V"'); Set-ItemProperty -Path 'Registry::HKEY_CLASSES_ROOT\Directory\Background\shell\powershell-wt\command' -Name '(default)' -Value ('"' + $previewWt + '" new-tab -p "PowerShell" --startingDirectory "%V"'); Set-ItemProperty -Path 'Registry::HKEY_CLASSES_ROOT\Directory\Background\shell\wsl22\command' -Name '(default)' -Value ('"' + $previewWt + '" new-tab -p "{4ff56d04-d9cf-57ea-bae2-ad396374e7e3}" --startingDirectory "%V"'); Set-ItemProperty -Path 'Registry::HKEY_CLASSES_ROOT\Directory\Background\shell\wsl24\command' -Name '(default)' -Value ('"' + $previewWt + '" new-tab -p "{d8e96812-b789-5068-a5ae-10b2fb53e95f}" --startingDirectory "%V"')验证命令值里没有换行:
'gitbash-wt','powershell-wt','wsl22','wsl24'|%{$v=(Get-ItemProperty "Registry::HKEY_CLASSES_ROOT\Directory\Background\shell\$_\command").'(default)';[PSCustomObject]@{Key=$_;HasNewline=($v.Contains("`r") -or $v.Contains("`n"));Value=$v}}|fl注意:不要用 -f 拼接这两条 WSL 命令,因为 GUID 里的 {} 会被 PowerShell 当成格式化占位符。
清理与回退
删除这 4 个右键菜单:
Remove-Item -Path 'Registry::HKEY_CLASSES_ROOT\Directory\Background\shell\gitbash-wt' -Recurse -Force -ErrorAction SilentlyContinue; Remove-Item -Path 'Registry::HKEY_CLASSES_ROOT\Directory\Background\shell\powershell-wt' -Recurse -Force -ErrorAction SilentlyContinue; Remove-Item -Path 'Registry::HKEY_CLASSES_ROOT\Directory\Background\shell\wsl22' -Recurse -Force -ErrorAction SilentlyContinue; Remove-Item -Path 'Registry::HKEY_CLASSES_ROOT\Directory\Background\shell\wsl24' -Recurse -Force -ErrorAction SilentlyContinue切回正式版 Windows Terminal:
$stableWt=Join-Path $env:USERPROFILE 'AppData\Local\Microsoft\WindowsApps\wt.exe'; Set-ItemProperty -Path 'Registry::HKEY_CLASSES_ROOT\Directory\Background\shell\gitbash-wt\command' -Name '(default)' -Value ('"' + $stableWt + '" new-tab -p "Git Bash" --startingDirectory "%V"'); Set-ItemProperty -Path 'Registry::HKEY_CLASSES_ROOT\Directory\Background\shell\powershell-wt\command' -Name '(default)' -Value ('"' + $stableWt + '" new-tab -p "PowerShell" --startingDirectory "%V"'); Set-ItemProperty -Path 'Registry::HKEY_CLASSES_ROOT\Directory\Background\shell\wsl22\command' -Name '(default)' -Value ('"' + $stableWt + '" new-tab -p "{4ff56d04-d9cf-57ea-bae2-ad396374e7e3}" --startingDirectory "%V"'); Set-ItemProperty -Path 'Registry::HKEY_CLASSES_ROOT\Directory\Background\shell\wsl24\command' -Name '(default)' -Value ('"' + $stableWt + '" new-tab -p "{d8e96812-b789-5068-a5ae-10b2fb53e95f}" --startingDirectory "%V"')恢复 Preview 的旧 settings.json 备份:
$previewDir=Join-Path $env:LOCALAPPDATA 'Packages\Microsoft.WindowsTerminalPreview_8wekyb3d8bbwe\LocalState'; Copy-Item -LiteralPath (Join-Path $previewDir 'settings.json.bak-20260507-215717') -Destination (Join-Path $previewDir 'settings.json') -Force如果 Preview 下 Ubuntu 24 不能在当前目录打开,补上对应 profile 的 commandline:
{
  "commandline": "wsl.exe -d Ubuntu-24.04",
  "guid": "{d8e96812-b789-5068-a5ae-10b2fb53e95f}",
  "name": "Ubuntu 24.04.1 LTS"
}