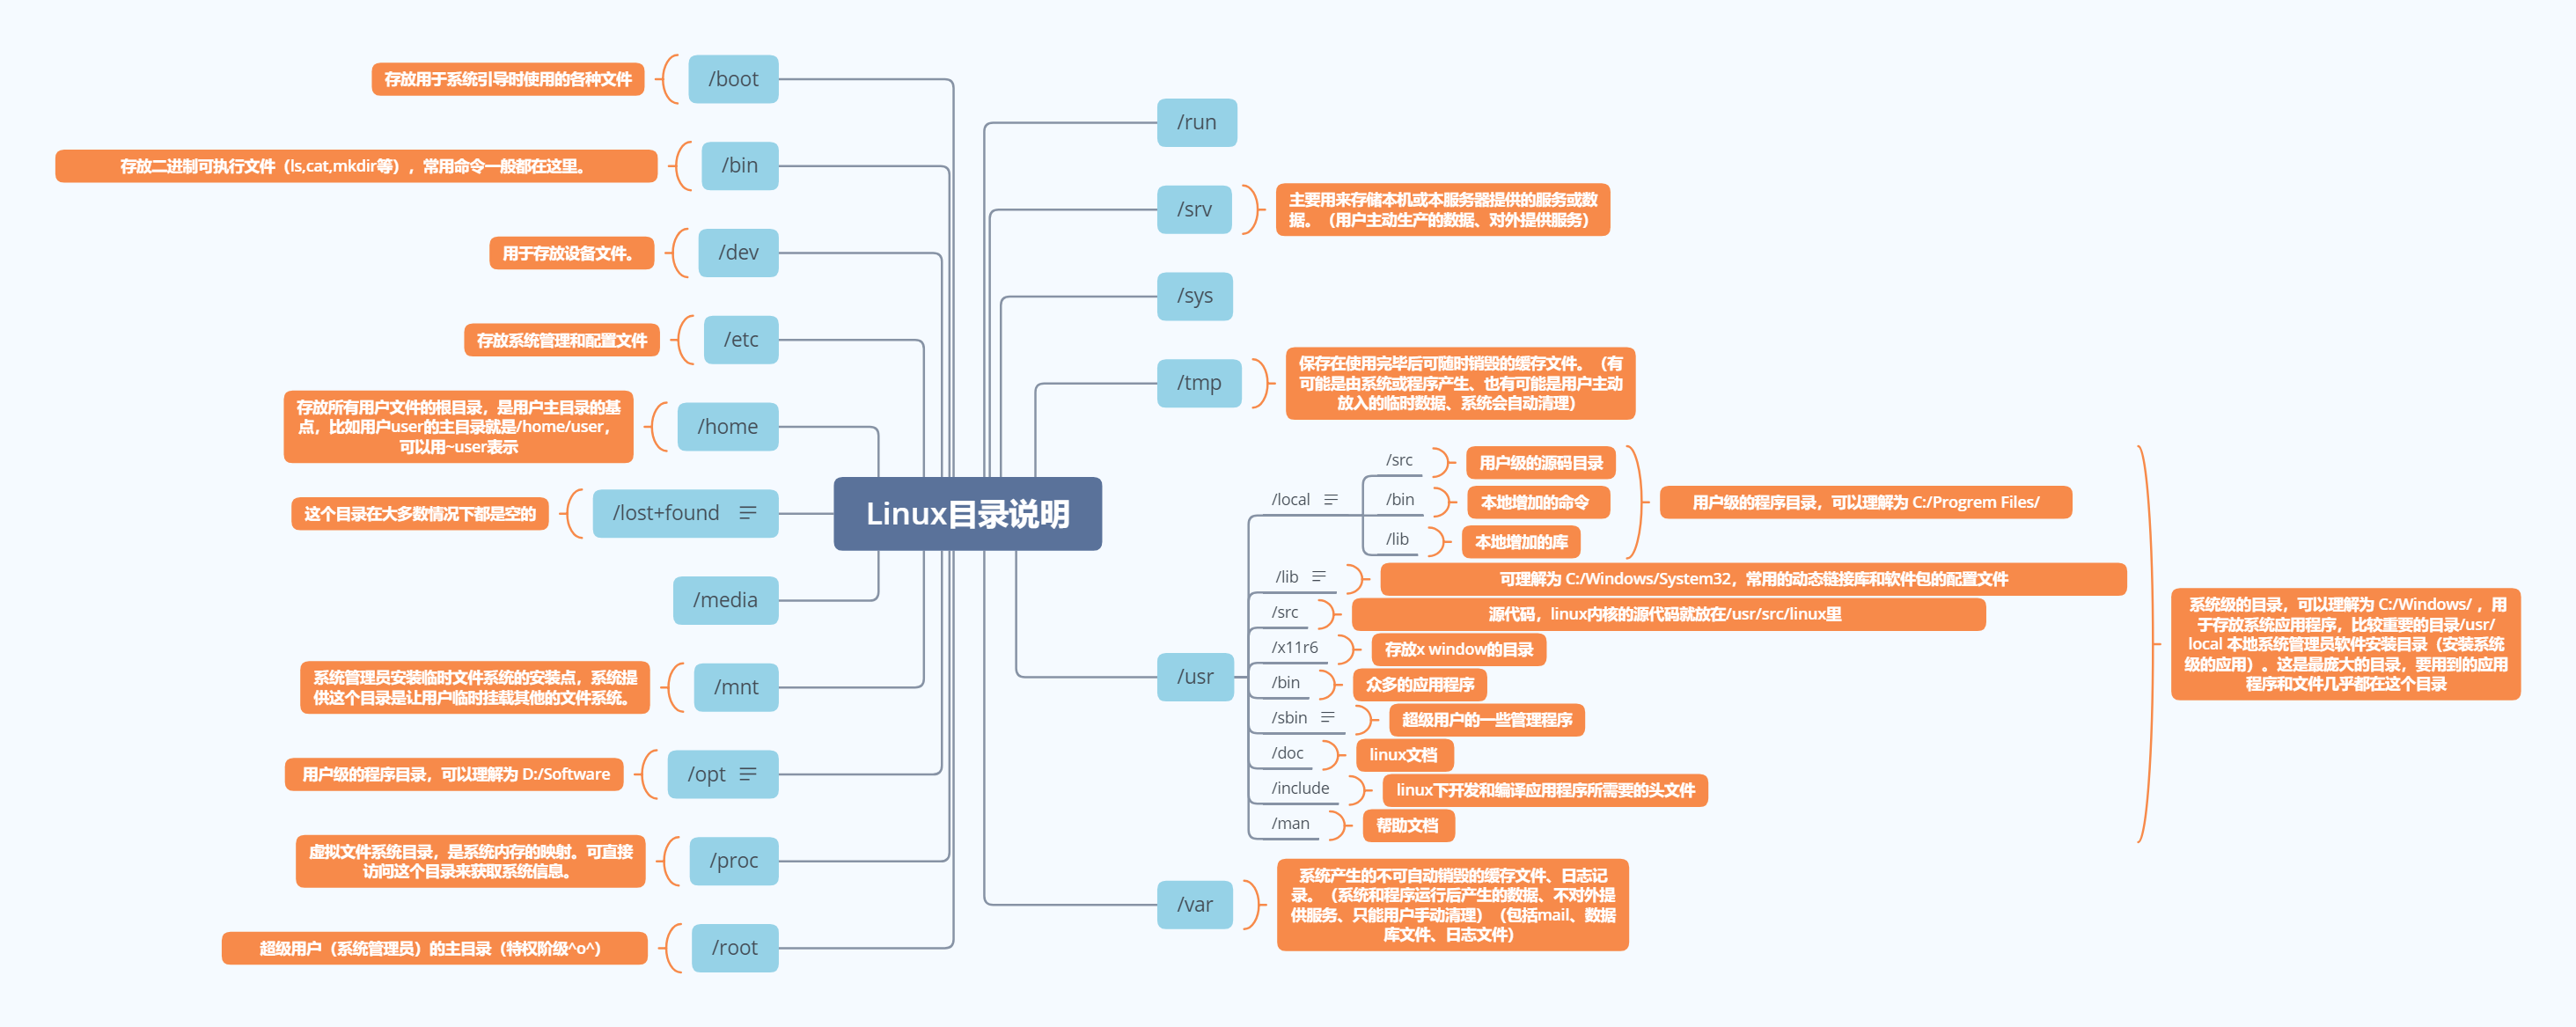
Linux
Linux
📌 Linux 目录

📌 学习资源
📌 一键 DD
github https://github.com/bin456789/reinstall
注意不支持本地 iso
# 安装下载镜像的工具
apt update || true && apt install cpufrequtils -y || true && apt install nano -y || true && apt install mdadm -y || true && apt install vim -y || true && apt install isc-dhcp-server -y || true && apt install numactl -y || true && apt install lm-sensors -y || true && apt install htop -y || true && apt install dmidecode -y || true && apt install zfsutils-linux -y || true && apt install zfs-auto-snapshot -y || true && apt install iputils-ping -y || true && apt install aria2 -y || true && apt install sysbench -y || true

# 当前系统是 Linux
# 国外下载
curl -O https://raw.githubusercontent.com/bin456789/reinstall/main/reinstall.sh || wget -O ${_##*/} $_
# 国内服务器
curl -O https://cnb.cool/bin456789/reinstall/-/git/raw/main/reinstall.sh || wget -O ${_##*/} $_

# 从 linux dd 到 linux
bash reinstall.sh ubuntu 24.04 --password "xxxxxx" --ssh-port 22

# 从 linux dd 到 Windows
bash reinstall.sh windows \
     --image-name "Windows Server 2022 SERVERDATACENTER" \
     --iso "your_windows_remote_download_url"

# 终止安装
killall trans.start
killall aria2c
# 然后编辑 /trans.sh 找到 extract_env_from_cmdline,下面一行添加 iso=新url地址
# 再运行/trans.sh
# 像这样编辑下载地址
extract_env_from_cmdline() {
    # 提取 finalos/extra 到变量
    for prefix in finalos extra; do
        while read -r line; do
            if [ -n "$line" ]; then
                key=$(echo $line | cut -d= -f1)
                value=$(echo $line | cut -d= -f2-)
                eval "$key='$value'"
            fi
        done < <(xargs -n1 </proc/cmdline | grep "^${prefix}_" | sed "s/^${prefix}_//")
    done
    iso="magnet:?xt=urn:btih:7d22a1057235b508736efa660c98b90f8a717380&dn=zh-cn_windows_server_2025_updated_jan_2025_x64_dvd_7a8e5a29.iso&xl=7594012672"
}

echo 'Windows Server 2025 SERVERSTANDARD' >/image-name

# 这样子搜索
# zh-cn_windows_server_2025_x64_dvd_1d93dd12.iso
# zh-cn_windows_server_2025_updated_feb_2025_x64_dvd_3733c10e.iso

# 下载镜像
wget -O windows2022.iso "https://delivery.massgrave.dev/706db63b-5716-4158-ab66-4f12e594d955/zh-cn_windows_server_2022_updated_nov_2024_x64_dvd_4e34897c.iso?t=4e3d2975-599f-4410-a1c1-768738e09d26&P1=1740266314&P2=601&P3=2&P4=bZJrv9CHTLoUIvg3dmYMTSaDrBedIZaCeRIc5fUcf5U%3D"
# 开始安装
     bash reinstall.sh windows \
     --image-name "Windows Server 2022 SERVERDATACENTER" \
     --iso "https://delivery.massgrave.dev/706db63b-5716-4158-ab66-4f12e594d955/zh-cn_windows_11_business_editions_version_24h2_x64_dvd_5f9e5858.iso?t=e4e850b4-a0e3-4d64-8317-063f55463030&P1=1740529100&P2=601&P3=2&P4=xM4gHpk3FQIbH%2Fc0t%2BoZzaCbT0LuCMYC5TySc7E4Z8c%3D"

     # Windows Server Standard
     bash reinstall.sh windows \
     --image-name "Windows Server 2025 SERVERSTANDARD" \
     --iso "https://oemsoc.download.prss.microsoft.com/dbazure/X23-81958_26100.1742.240906-0331.ge_release_svc_refresh_SERVER_OEMRET_x64FRE_en-us.iso_909fa35d-ba98-407d-9fef-8df76f75e133?t=34b8db0f-439b-497c-86ce-ec7ceb898bb7&P1=102816956391&P2=601&P3=2&P4=pG1WoVpBKlyWcmfj%2bt1gYgkTsP4At28ch8mG7vIQm%2fT4elz5v2ZQ3eKAN8%2fFjb1yaa4npBaABURtnI8YmrDv8p0VJmYpLCIUQ0FHEFR4IFiPgtvzwAAI8oNdiEl%2b2uM7MN8Gaju8BvIVgHRl%2fRxq0HFgrFoEGmvHZU4jY0RFsYAaHliUinDUzdVfT0IPwyWqNUJXZTSfguyphv8XZx8OQsBy3zwBp7tNHsKl36ZO2JdZK%2fyPY7QTpAr5ccazUPEa40ALhYRBJXxlQb1F0OeO7kHhW7DKK5D4Wpt5WbpjFn8MqcZBX3%2fQI6WAwzDSKIck7jYL7bYdl2ufoMRrFZrxxw%3d%3d"
oh-my-zsh
检查是否安装 zsh
zsh --version如果没安装
# 显示默认的 shell echo $SHELL # 安装 zsh sudo apt install zsh # 检查是否安装 zsh zsh --version # 设置为默认 shell chsh -s $(which zsh) # 设置为默认 shell(Fedora) sudo lchsh $USER不行的话查看文档:https://github.com/ohmyzsh/ohmyzsh/wiki/Installing-ZSH
安装 oh-my-zsh 官方文档
sh -c "$(curl -fsSL https://raw.githubusercontent.com/ohmyzsh/ohmyzsh/master/tools/install.sh)"剩下的可以查看 mac 下的配置:https://doc.yoouu.cn/basic/mac.html#oh-my-zsh
📌 ssh 登录服务器
ssh -p 12333 root@${your ip}
# 使用密钥文件
ssh -i ~/work/data/id_rsa -p 22 root@{your ip}
配置 ssh 密钥文件登录
需要检查密钥文件是否存在,请运行ls命令ls -l ~/.ssh/id_*.pub检查是否存在。
1. 制作密钥对
首先在服务器上制作密钥对。首先用密码登录到你打算使用密钥登录的账户,然后执行以下命令:
ssh-keygen -t rsa -b 4096 -C "your_email@domain.com"Generating public/private rsa key pair.
Enter file in which to save the key (/root/.ssh/id_rsa): <== 按 Enter
Created directory '/root/.ssh'.
Enter passphrase (empty for no passphrase): <== 输入密钥锁码,或直接按 Enter 留空
Enter same passphrase again: <== 再输入一遍密钥锁码
Your identification has been saved in /root/.ssh/id_rsa. <== 私钥
Your public key has been saved in /root/.ssh/id_rsa.pub. <== 公钥
The key fingerprint is:
0f:d3:e7:1a:1c:bd:5c:03:f1:19:f1:22:df:9b:cc:08 root@host密钥锁码在使用私钥时必须输入,这样就可以保护私钥不被盗用。当然,也可以留空,实现无密码登录。
现在,在 root 用户的家目录中生成了一个 .ssh 的隐藏目录,内含两个密钥文件。id_rsa 为私钥,id_rsa.pub 为公钥。
2. 在服务器上安装公钥
现在您本地 Ubuntu 计算机有了 SSH 密钥,下一步是将公用密钥复制到要管理的远程服务器。
将公钥复制到服务器的最简单和建议的方法是使用ssh-copy-id命令。运行命令ssh-copy-id server_username@server_ip_address即可复制远程服务器。
server_username是远程服务器用户的名称,server_ip_address是你的服务器 IP 地址。系统将提示您输入远程用户密码。
通过身份验证后,公钥~/.ssh/id_rsa.pub将追加到远程用户~/.ssh/authorized_keys文件中,然后 ssh-copy-id 将会退出。
并且提示你可以运行命令ssh 'username@server_ip_address'登录到远程服务器。
ssh-copy-id remote_username@server_ip_address
remote_username@server_ip_address's password:如果由于某些原因您的本地计算机上没有ssh-copy-id实用程序,请使用以下命令复制公钥。
cat ~/.ssh/id_rsa.pub | ssh remote_username@server_ip_address "mkdir -p ~/.ssh && chmod 700 ~/.ssh && cat >> ~/.ssh/authorized_keys && chmod 600 ~/.ssh/authorized_keys"
Number of key(s) added: 1

Now try logging into the machine, with:   "ssh 'username@server_ip_address'"
and check to make sure that only the key(s) you wanted were added.
完成上述步骤后,您应该能够免密码登录到远程服务器。要测试它,请尝试通过 SSH 登录到服务器。
键入以下命令,在服务器上安装公钥:
[root@host ~]$ cd .ssh
[root@host .ssh]$ cat id_rsa.pub >> authorized_keys
如此便完成了公钥的安装。为了确保连接成功,请保证以下文件权限正确:
[root@host .ssh]$ chmod 600 authorized_keys
[root@host .ssh]$ chmod 700 ~/.ssh
# Ubuntu ssh免密配置之后仍然需要输入密码
chmod go-w ~/
chmod 700 ~/.ssh
chmod 600 ~/.ssh/authorized_keys
3. 设置 SSH,打开密钥登录功能
编辑 /etc/ssh/sshd_config 文件,进行如下设置:
RSAAuthentication yes
PubkeyAuthentication yes
另外,请留意 root 用户能否通过 SSH 登录:
PermitRootLogin yes当你完成全部设置,并以密钥方式登录成功后,再禁用密码登录:
PasswordAuthentication no最后,重启 SSH 服务:
# RHEL/CentOS系统
service sshd restart
# Ubuntu系统
service ssh restart
# Debian系统
/etc/init.d/ssh restart
📌 ubuntu
常用工具包
# 安装工具包
apt update || true && apt install cpufrequtils -y || true && apt install nano -y || true && apt install mdadm -y || true && apt install vim -y || true && apt install isc-dhcp-server -y || true && apt install numactl -y || true && apt install lm-sensors -y || true && apt install htop -y || true && apt install dmidecode -y || true && apt install iputils-ping -y || true && apt install aria2 -y || true && apt install sysbench -y || true && apt install parted -y || true && apt install parallel -y || true
aria2 快速多线程下载
# 多线程下载(16个连接)
aria2c -x 16 -s 16 "文件直链"
优化 shell
# 安装 ZSH
sudo apt install zsh -y

# 安装 Oh My Zsh
sh -c "$(curl -fsSL https://raw.github.com/ohmyzsh/ohmyzsh/master/tools/install.sh)"

# 设为默认 shell
chsh -s $(which zsh)

# ZSH 自动建议
git clone https://github.com/zsh-users/zsh-autosuggestions ${ZSH_CUSTOM:-~/.oh-my-zsh/custom}/plugins/zsh-autosuggestions

# ZSH 语法高亮
git clone https://github.com/zsh-users/zsh-syntax-highlighting.git ${ZSH_CUSTOM:-~/.oh-my-zsh/custom}/plugins/zsh-syntax-highlighting

# 然后在 ~/.zshrc 中添加这些插件:
nano ~/.zshrc
plugins=(git zsh-autosuggestions zsh-syntax-highlighting)
plugins=(git zsh-autosuggestions zsh-syntax-highlighting bundler dotenv macos rake rbenv ruby)
ubuntu 24.04 LTS 换软件源(针对大陆)
首先,备份原有的源文件:
sudo cp /etc/apt/sources.list.d/ubuntu.sources /etc/apt/sources.list.d/ubuntu.sources.bak使用 vim 编辑源文件:
sudo vim /etc/apt/sources.list.d/ubuntu.sources进入 vim 后,按
i键进入插入模式,然后删除所有现有内容(可以用gg移到文件开头,然后dG删除到文件末尾)。粘贴以下内容(以清华大学镜像源为例):
Types: deb deb-src
URIs: https://mirrors.tuna.tsinghua.edu.cn/ubuntu/
Suites: noble noble-updates noble-backports noble-security
Components: main restricted universe multiverse
Signed-By: /usr/share/keyrings/ubuntu-archive-keyring.gpg

Types: deb deb-src
URIs: https://mirrors.tuna.tsinghua.edu.cn/ubuntu/
Suites: noble-proposed
Components: main restricted universe multiverse
Enabled: no
Signed-By: /usr/share/keyrings/ubuntu-archive-keyring.gpg
保存并退出编辑器(如果使用nano,按Ctrl+X,然后按Y,最后按Enter)。
更新软件包列表:
sudo apt update升级软件包:
sudo apt upgrade
其他常用的国内镜像源:
- 阿里云:将 URIs 中的地址改为
https://mirrors.aliyun.com/ubuntu/ - 中科大:将 URIs 中的地址改为
https://mirrors.ustc.edu.cn/ubuntu/ - 网易:将 URIs 中的地址改为
https://mirrors.163.com/ubuntu/
注意:
- 确保使用 "noble" 作为版本代号,因为您使用的是 Ubuntu 24.04 LTS。
- 如果您希望启用 proposed 仓库,可以将最后一个条目中的
Enabled: no改为Enabled: yes。但请注意,proposed 仓库包含未经充分测试的更新,可能会导致系统不稳定。
安装 zsh 和配置
教程来源:https://github.com/ohmyzsh/ohmyzsh/wiki/Installing-ZSH
# 安装 zsh
sudo apt install zsh
# 检查 zsh 是否安装和查看版本
zsh --version
# 设置 Zsh 为默认 Shell
chsh -s $(which zsh)
# 此命令会将当前用户的默认 shell 更改为 Zsh。你需要退出当前会话并重新登录,或者直接重启系统以使更改生效。
# 配置 Zsh 安装 Oh My Zsh
sh -c "$(curl -fsSL https://raw.githubusercontent.com/ohmyzsh/ohmyzsh/master/tools/install.sh)"
# 或者,如果你没有 curl,可以使用 wget
sh -c "$(wget -O- https://raw.githubusercontent.com/ohmyzsh/ohmyzsh/master/tools/install.sh)"
# 验证默认 Shell 输出应该是 /usr/bin/zsh 或 /bin/zsh。
echo $SHELL

# 国内安装
sh -c "$(curl -fsSL https://gitee.com/mirrors/oh-my-zsh/raw/master/tools/install.sh)"
挂载硬盘
ubuntu 查看端口被占用并处理
netstat -tunlp | grep 端口号- -t (tcp) 仅显示 tcp 相关选项
- -u (udp)仅显示 udp 相关选项
- -n 拒绝显示别名,能显示数字的全部转化为数字
- -l 仅列出在 Listen(监听)的服务状态
- -p 显示建立相关链接的程序名
如查看**端口,也可以在终端中输入:
lsof -i:**若要停止使用这个端口的程序,使用 kill +对应的 pid
kill pidubuntu22.4 开启 root 登录
# 修改 ssh 配置
sudo nano /etc/ssh/sshd_config
# 至少保证
Port 22
PermitRootLogin yes
PasswordAuthentication yes
UsePAM yes
# 修改完成按 ctrl+o 然后 enter 保存 然后 ctrl+x 退出
# 重启 ssh 服务
sudo systemctl restart ssh
# 或者
sudo systemctl restart ssh.socket

# Ubuntu 24 默认用 systemd socket 激活 sshd
sudo systemctl stop ssh.socket
sudo systemctl disable ssh.socket
sudo systemctl enable ssh.service
sudo systemctl restart ssh.service
更改 ssh 端口
# 修改 ssh 配置
sudo nano /etc/ssh/sshd_config
# 至少保证
Port 22

# 修改完成按 ctrl+o 然后 enter 保存 然后 ctrl+x 退出
# 重启 ssh 服务
sudo systemctl restart ssh
# 或者
sudo systemctl restart ssh.socket

# Ubuntu 24 默认用 systemd socket 激活 sshd
sudo systemctl stop ssh.socket
sudo systemctl disable ssh.socket
sudo systemctl enable ssh.service
sudo systemctl restart ssh.service
# 禁止远程登录 root 用户
# 将 PermitRootLogin 改为 PermitRootLogin no
修改 root 密码
sudo passwd root
# 可以和 ubuntu 密码一致,也可以修改 (密码会让你输入两次)
# 修改 ssh 配置
sudo vi /etc/ssh/sshd_config
# 修 改 PermitRootLogin 进入 ssh 配置界面后找到 PermitRootLogin,将它后面改为 yes,保存 (按 i 进入编辑模式,编辑完 esc 退出,:w 保存当前文件,:q 退出)
# 重启 ssh 服务
sudo service ssh restart
连接虚拟机中的 ubuntu
# 1 安装ssh
sudo apt-get install openssh-server
# 2 启动ssh服务和确认
sudo /etc/init.d/ssh start
# 3 确认ssh服务启动
ps -e | grep ssh
📌 查看 LINUX 发行版本名和版本号
2017-01-16
最近跟合作方支付公司(一个北京的互联网支付公司,就不具体提名字啦)沟通的时候,需要对方生成非对称加密密钥公钥提供给我方,对方技术是个妹子。不懂怎么在预发/生产机器上面生成加密算法的公私钥,也不知道怎么查看系统版本。属于一问三不知类型,怎么办~ 我也只能打电话过去一步步手把手教如何查看发行版,如何安装命令,如何生成对应的公私钥。下面讲讲如何查看系统发行版和版本号。
查看 LINUX 发行版的名称及其版本号的命令,这些信息对于添加正确的软件更新源很有用,而当你只能在命令行下工作的时候,下面的方法可以帮忙。
一、查看 Linux 内核版本命令(两种方法):
1、cat /proc/version
[root@localhost ~]# cat /proc/version
Linux version 2.6.18-194.8.1.el5.centos.plus
(mockbuild@builder17.centos.org) (gcc version 4.1.220080704
(Red Hat 4.1.2-48)) #1 SMP Wed Jul 7 11:50:45 EDT 20102、uname -a
[root@localhost ~]# uname -a
Linux localhost.localdomain 2.6.18-194.8.1.el5.centos.plus
#1 SMP Wed Jul 7 11:50:45 EDT 2010 i686 i686 i386 GNU/Linux
二、查看 Linux 系统版本的命令(3 种方法):
1、lsb_release -a,即可列出所有版本信息:
[root@localhost ~]# lsb_release -a
LSB Version: :core-3.1-ia32:core-3.1-noarch:graphics-3.1-ia32:graphics-3.1-noarch
Distributor ID: CentOS
Description: CentOS release 6.5 (Final)
Release: 6.5
Codename: Final
这个命令适用于所有的 Linux 发行版,包括 Redhat、SuSE、Debian…等发行版。2、cat /etc/redhat-release,这种方法只适合 Redhat 系的 Linux:
[root@localhost ~]# cat /etc/redhat-release
CentOS release 6.7 (Final)3、cat /etc/issue,此命令也适用于所有的 Linux 发行版。
[root@localhost ~]# cat /etc/issue
CentOS release 6.7 (Final)
Kernel \r on an \m
📌 Ubuntu 更新软件和系统
apt-get update: 升级安装包相关的命令,刷新可安装的软件列表(但是不做任何实际的安装动作)
apt-get upgrade: 进行安装包的更新(软件版本的升级)
apt-get dist-upgrade: 进行系统版本的升级(Ubuntu 版本的升级)
do-release-upgrade: Ubuntu 官方推荐的系统升级方式,若加参数-d 还可以升级到开发版本,但会不稳定
📌 申请通配符证书
安装 certbot

$ sudo apt-get update
$ sudo apt-get install software-properties-common
$ sudo add-apt-repository ppa:certbot/certbot
$ sudo apt-get update
$ sudo apt-get install certbot
申请证书
sudo certbot certonly --manual -d example.com -d *.example.com --preferred-challenges dns --server https://acme-v02.api.letsencrypt.org/directory例如
sudo certbot certonly --manual -d yoouu.cn -d *.yoouu.cn --preferred-challenges dns --server https://acme-v02.api.letsencrypt.org/directory按照提示设置 DNS 解析

Nginx 配置
server {
    listen      80;
    server_name example.com;
    return      301     https://$server_name$request_uri;
}

server {
    listen      443 ssl;
    server_name example.com;

    charset     utf-8;

    add_header X-Content-Type-Options nosniff;

    ssl on;
    ssl_certificate     /etc/letsencrypt/live/example.com/fullchain.pem;
    ssl_certificate_key /etc/letsencrypt/live/example.com/privkey.pem;

}